


Arduino is an open-source electronics platform based on easy-to-use hardware and software. Arduino boards are able to read inputs – light on a sensor, a finger on a button, or a Twitter message – and turn it into an output – activating a motor, turning on an LED, publishing something online. You can tell your board what to do by sending a set of instructions to the microcontroller on the board. To do so you use the Arduino programming language (based on Wiring), and the Arduino Software (IDE), based on Processing.
Primary use of this device is to build electronic projects. It consists of a pre-programmed microcontroller or integrated development environment, used to write the code and upload it to the physical board. The code of the board is stored in the program, whereas the data is stored in data memory. There are various types of Arduino boards, namely, Arduino Uno (R3), LilyPadArduino, Redboard, Arduino Mega (R3), and ArduinoLeonardo, these are used for various purposes.These devices are used to make communicating objects, taking i/p from different kinds of sensors and controlling the motors, lights, and various physical o/p’s.
What’s on the box?
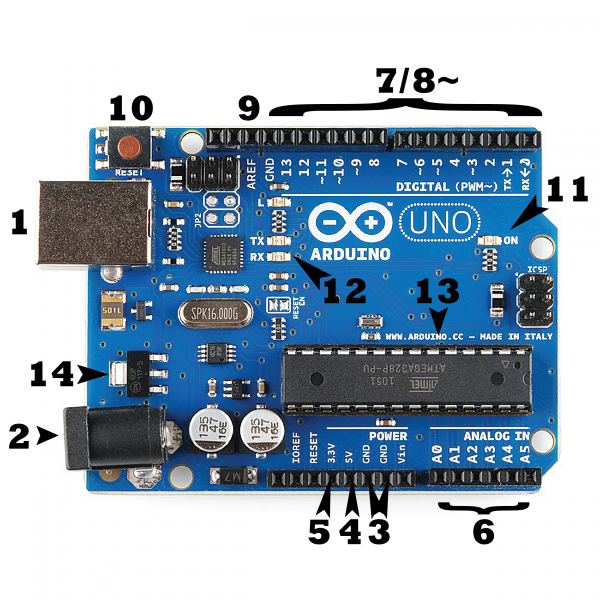
There are many varieties of Arduino boards that can be used for different purposes. Some boards look a bit different from the one below, but most Arduinos have the majority of these components in common:

1. Power (USB / Barrel Jack)
Every Arduino board needs a way to be connected to a power source. The Arduino UNO can be powered from a USB cable coming from your computer or a wall power supply that is terminated in a barrel jack. In the picture above the USB connection is labeled (1) and the barrel jack is labeled (2).
NOTE: Do NOT use a power supply greater than 20 Volts as you will overpower (and thereby destroy) yourArduino. The recommended voltage for most Arduino models is between 6 and 12 Volts.
2. Pins (5V, 3.3V, GND, Analog, Digital, PWM, AREF)
The pins on your Arduino are the places where you connect wires to construct a circuit (probably in conjuction with a breadboard and some wire. They usually have black plastic ‘headers’ that allow you to just plug a wire right into the board. The Arduino has several different kinds of pins, each of which is labeled on the board and used for different functions.
• GND (3): Short for ‘Ground’. There are several GND pins on the Arduino, any of which can be used to ground your circuit.
• 5V (4) & 3.3V (5): As you might guess, the 5V pin supplies 5 volts of power, and the 3.3V pin supplies 3.3 volts of power. Most of the simple components used with the Arduino run happily off of 5 or 3.3 volts.
• Analog (6): The area of pins under the ‘Analog In’ label (A0 through A5 on the UNO) are Analog In pins. These pins can read the signal from an analog sensor and convert it into a digital value that we can read.
• Digital (7): Across from the analog pins are the digital pins (0 through 13 on the UNO). These pins can be used for both digital input (like telling if a button is pushed) and digital output (like powering an LED).
• PWM (8): You may have noticed the tilde (~) next to some of the digital pins (3, 5, 6, 9, 10, and 11 on the UNO). These pins act as normal digital pins, but can also be used for something called Pulse-Width Modulation (PWM).
• AREF (9): Stands for Analog Reference. Most of the time you can leave this pin alone. It is sometimes used to set an external reference voltage (between 0 and 5 Volts) as the upper limit for the analog input pins.
3. Reset Button
Just like the original Nintendo, the Arduino has a reset button (10). Pushing it will temporarily connect the reset pin to ground and restart any code that is loaded on the Arduino. This can be very useful if your code doesn’t repeat, but you want to test it multiple times. Unlike the original Nintendo however, blowing on the Arduino doesn’t usually fix any problems.
4. Power LED Indicator
Just beneath and to the right of the word “UNO” on your circuit board, there’s a tiny LED next to the word ‘ON’ (11). This LED should light up whenever you plug your Arduino into a power source. If this light doesn’t turn on, there’s a good chance something is wrong. Time to re-check your circuit!
5. TX RX LEDs
TX is short for transmit, RX is short for receive. These markings appear quite a bit in electronics to indicate the pins responsible for serial communication .In our case, there are two places on the Arduino UNO where TX and RX appear — once by digital pins 0 and 1, and a second time next to the TX and RX indicator LEDs (12). These LEDs will give us some nice visual indications whenever our Arduino is receiving or transmitting data .
6. Main IC
The black thing with all the metal legs is an IC, or Integrated Circuit (13). Think of it as the brains of Arduino. The main IC on the Arduino is slightly different from board type to board type, but is usually from the ATmega line of IC’s from the ATMEL company. This can be important, as you may need to know the IC type (along with your board type) before loading up a new program from the Arduino software. This information can usually be found in writing on the top side of the IC.
7. Voltage Regulator
The voltage regulator (14) is not actually something you can (or should) interact with on the Arduino. But it is potentially useful to know that it is there and what it’s for. The voltage regulator does exactly what it says — it controls the amount of voltage that is let into the Arduino board. Think of it as a kind of gatekeeper; it will turn away an extra voltage that might harm the circuit. Of course, it has its limits, so don’t hook up your Arduino to anything greater than 20 volts.
What Does it Do?
The Arduino hardware and software was designed for artists, designers, hobbyists, hackers, newbies, and anyone interested in creating interactive objects or environments. Arduino can interact with buttons, LEDs, motors, speakers, GPS units, cameras, the internet, and even your smart-phone or your TV! This flexibility combined with the fact that the Arduino software is free, the hardware boards are pretty cheap, and both the software and hardware are easy to learn has led to a large community of users who have contributed code and released instructions for a huge variety of Arduino-based projects.
The applications of the Arduino board are mainly involved in Arduino projects that include obstacle avoidance, industrial appliance control, electric appliance control, intensity controlling of street lights, home automation, underground cable fault detection, solar street light, etc. For a better understanding of these applications here we are explaining with an appropriate diagram (wherever required). Some of the most important Arduino projects for engineering students are discussed below.
LED Street Lights with Auto Intensity Control


All thanks to Arduino for controlling the auto intensity of the street lights. It uses LED lightsinstead of HID lamps in the street lights. LEDs consumes way less power than HID resulting in better lifetime value of LEDs as compared to HID.An Arduino board is used to control the intensity of lights by developing PWM signals that make MOSFET to switch a set of light-emitting diodes to get the desired operation.
The Arduino board comprises programmable commands that control the light intensity based on PWM signals produced. The light intensity is kept high during night time when the traffic on the roads decreases slowly and the light intensity also decreases increasingly until morning.
Arduino based Project on Home Automation

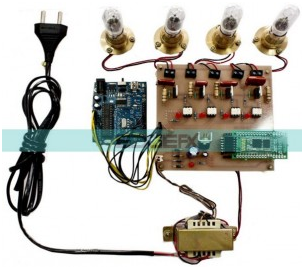
One of the main concept of this project is to design a home automation system using an Arduino board with any Android operating system based smartphone or tablet. As day by day technology is developing and houses are getting very smart. Presently, conventional switches are placed at different places of the house. But, operating that switches to go near them is very difficult for the user. So, this project gives the best solution with smartphones.
At the receiver end a Bluetooth device is connected to the Arduino board, whereas at the transmitter end, a GUI application on a cell phone sends ON/OFF commands to the receiver. By pressing the particular location on the GUI, the loads can be ON/OFF remotely. These loads can be controlled by an Arduino board via Thyristors and optoisolators using TRIACS.
Arduino Operated Obstacle Avoidance Robot

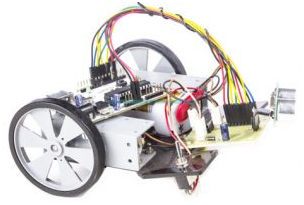
Arduinois used to design a robotic vehicle which is used to avoid an obstacle. This project uses an ultrasonic sensor for the movement of the robot. Whenever a robot detects an obstacle ahead of it, then immediately it sends the signals to the Arduino board. Depending upon the i/p signal received, the microcontroller sends the command to the robot to move in a different direction by properly activating the motors interfaced through a motor driver IC.
Arduino based Electrical Appliances Control using IR
Arduinois really helpful in controlling electrical appliances using an IR remote. The remote sends the coded infrared data received from the sensor which is connected to the control unit. Moreover, it controls the electrical loads depending on the data received from the remote.
This project controls the integrated household appliances to a control unit which can be operated by a remote. The RC5 coded data which are sent from the remote is received by an infrared receiver to an Arduino board. The program to the Arduino board states the RC5 code to produce relevant o/p based on the i/p data to function a set of relays over a relay driver IC.
Arduino based Solar Street Light

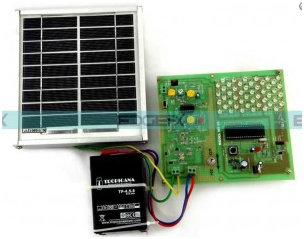
Other uses of Arduino includes designing a solar street light using an Arduino board. It is used to control intensity of light. In this project, PV panels are used to charge the batteries by altering the sunlight into electricity, and the charging of this battery can be controlled by using a charge controller circuit. Street light intensity is kept high in peak hours.
When the vehicles on the roads decrease slowly in the midnights, then the light intensity can be decreased gradually till morning to conserve energy. Therefore, the street lights turn ON at the sunset and then switch OFF at the sunrise routinely.
LPG Gas Monitoring & Automatic Cylinder Booking with Alert System
Today, technology is being adapted in our daily life to make our day to day chores hassle-free. This project is also designed to make the task of LPG gas booking easy. The online system available today for booking an LPG cylinder is hardly effective for uneducated people. Moreover, there is no method implemented to know the status of the amount of gas present in the cylinder.
In this project, an Arduino based framework is designed that measures the amount of gas present in the cylinder and update the information regularly to the LPG agent. The system books the LPG cylinder automatically when the weight falls below the threshold value. Additionally, in this project, a gas sensor is embedded to detect gas leakage and alert the user.
Smart Glove for Sign Language Translation using Arduino
People communicate with each other to share information, experiences, ideas. Normally this is done through speaking, writing, hearing. People who are unable to hear and speak uses sign language to communicate with each other. But it becomes a challenging task when the person who wants to communicate with the disabled person doesn’t know the sign language.
In this Arduino based project, a system is designed which can convert the sigh language to voice command and vice-versa. Here, various sensors are embedded in the glove which senses various sign language gestures and sends signals. Arduino is used for collecting signals from these sensors. Using Bluetooth, Arduino sends these signals to an Android smartphone. This Android smartphone is used to convert the sign language gestures into voice commands and vice-versa.
WiFi based Low-cost Monitoring of ECG and Temperature Parameters using Arduino
In case of disasters or in remote areas, providing medical help during emergency situations becomes a challenging task. There may not be necessary medical equipment present to measure the vital signs of the patient. In this project, an Arduino based low-cost system is designed which will be highly useful in such situations.
Here, a pulse rate measurement sensor, and a temperature sensor is used to collect the ECG and temperature-related information of the patient. This information is sent to the website server through wifi. The doctor can access the website and monitor the patient’s condition, keep a check on his vital signs, and give necessary suggestions. This project is of low cost and easy to design.
Arduino Mini Projects for Diploma & Engineering Students
The following Arduino projects are suitable for a diploma as well as engineering students.
Automation System for Industries Controlled by Joystick & Arduino Nano
The proposed system like industrial automation can be controlled through a joystick &Arduinonano. This project is used to control four electrical appliances in industries.
Arduino based GPS Tracker
This project implements a GPS tracker system with the help of an Arduino board. This project is very helpful in tracking a child, vehicle location as well as other objects.
Arduino based Alarm Clock Radio
This proposed system designs an alarm clock radio with the help of an Arduino board. This project has one feature that is, it displays time, date & generates an alarm on the preferred time.
Wireless Frequency Meter using Arduino
This project implements a wireless frequency meter using the Arduino board. This project is mainly designed for measuring the sinusoidal AC signals frequency. The frequency range is from 50Hz to 3kHz.
Window Alarm Annunciator using Arduino Uno
This project implements a window alarm annunciator using the Arduino Uno board. This kind of annunciator is used for processing different power plants, industries by checking the conditions of plants & gives an alert to the operators regarding the abnormal conditions otherwise deviations of the parameter.
Noise Detector for Automatic Recording System
This project designs a noise detector for an automatic recording system using Arduino. This project is used in offices, classrooms, and libraries to detect noisy people and takes necessary action against them.
Fan Speed Monitoring & Controlling using Arduino
This project is used to monitor and control the electric fan speed based on the temperature using Arduino.
RF Controlled Robot using Arduino
This project implements a system namely RF controlled robot using an Arduino board. The design of this robot can be done very easily using RF. The controlling range of this RF remote is up to 100 meters through suitable antennae.